
Resizing Vintage Knitting Patterns – Step 3: Gauge Swatch
In case you haven’t read the first parts of this series, here are the links:
Introduction
Step 1: Analyzing the pattern
Step 2: Your mesurements
And now we come to the most unpopular part of this whole exercise: the gauge swatch. Sorry folks, there is no way around it, it is absolutely mandatory to knit a proper gauge swatch to get a well fitting sweater. Do NOT rely on the figures given by the yarn manufacturer or by figures from somebody else. You may knit with a totally different tension which will result in a totally different gauge and if you are working with other people’s figures you will not get a good fit.
But the good thing is: you don’t have to worry about meeting the gauge indicated in the pattern. This is, where my resizing method is different from most others you may find. You will have to the maths anyway, so it doesn’t matter if you hit the pattern’s gauge or not. Therefore you have to possibility to chose your yarn and needles in a way that you are pleased with the resulting fabric.
Recommendations for a proper gauge swatch
1. Cast on a sufficient number of stitches for a swatch of at least 4″ width. For most people the first and last few stitches of a row are not as homogenous as the fabric in the center of the knitting piece, so you do not want to include these stitches when counting out your gauge.
2. Knit a sufficient number of rows (see 1.)
3. Start and end your swatch with a few garter rows and start and end your rows with 3 garter stitches for a neat edge.
4. Work the swatch in the main stitch pattern of the garment you want to make.l
4. When you finished knitting your swatch wash and block it in the same way as you would wash and block your sweater. Let it dry completely before counting out the stitches and rows.
Stitch Pattern
So let us have a look at the stitch pattern of the Victory Sweater. It is a very simple lace pattern with only 2 repeat rows and 9 repeat stitches – ideal for newbies to lace knitting.
Pattern says:
1st row: * K. 2 tog., k. 2, wl.fwd., k. 1, wl.fwd., k. 2, slip 1, k. 1, p.s.s.o., rep. from * to end of row.
2nd row: Purl.
In modern knitting terms the pattern is
Row 1: (k2tog, k2, yo, k1,yo, k2, ssk) rep to end of row
Row 2: p all sts
If you are the visual type, you can also chart out the stitch pattern:
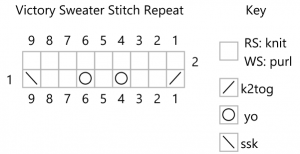
Since we have a 9 stitch repeat here, we need to cast on a multiple of 9 sts + 6 sts for the garter edges. I suggest 45 + 6 = 51 sts for a generously sized swatch.
Knitting the Swatch
So, cast on 51 sts.
Row 1 – 6: k all sts
Row 7: k3, (k2tog, k2, yo, k1, yo, k2, ssk) 5 times, k3
Row 8: p all sts
repeat Rows 7 and 8 until your work measures at least 4.5″
repeat Rows 1- 6 once
bind off loosely
Wash your swatch and block it gently – you do want the lace pattern to open up but you do not want to stretch the fabric too much. Let it dry completey (I recommend over night).
Counting out the swatch
Remove your swatch from the blocking board, but leave it lying on the board. Put 4 pins in at the edges of a 4″ x 4″ square and count the stitches and rows in betweeen. Note down the figures and divide them by 4 – these are your stitch and row gauge fo 1″.
And that’s it for today. See, the dreaded gauge swatch wasn’t so hard after all, was it?
In the next installment we will calculate the stitches and rows we need for our own sweater.
One Comment
Liz
Hello,
Thank you for your great series on resizing vintage patterns! Will you continue this series? or was part 3 the last part of the series? would love to hear more about how to do this.