
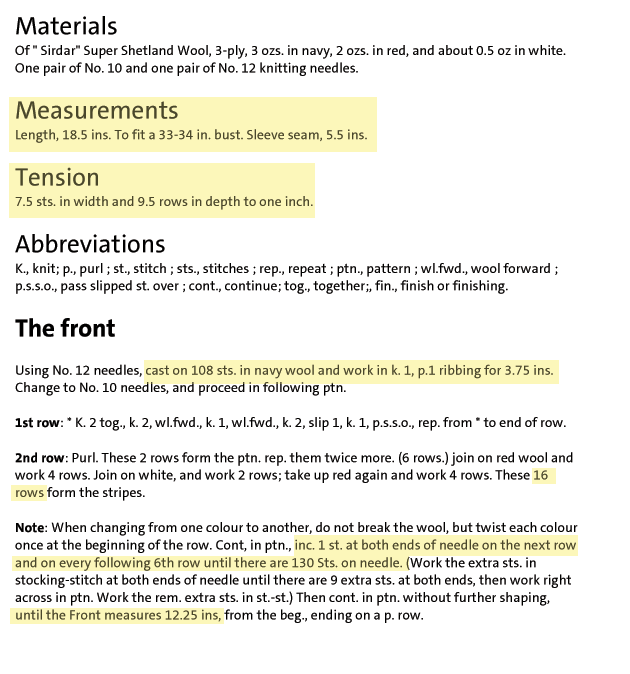
Resizing Vintage Knitting Patterns – Step 1: Analyzing the pattern
Welcome to our little resize-along for vintage patterns. In case you haven’t already done so, read the introduction if you want learn what this is about.
The first step is to analyse the pattern. What information about gauge and sizing can we obtain from the pattern? Sometimes you get nice little schematic drawings with measurements on them – this is perfect and saves a lot of time. But most of the time we only have the text. In most cases there is an indication of gauge and I recommend to use only patterns which give you a gauge. This will make the analysis way easier.
1. Highlight all information in the pattern regarding sizing and measurements
2. Gauge and Conversion Formula
The most important information we find in the pattern is the gauge (tension):
7.5 sts x 9 rows = 1″ x 1″
We can use these numbers to calculate the measurements from stitch or row counts indicated in the pattern. To calculate inches from number of stitches or rows you have to divide said number by the gauge value.
Example formula to convert 100 stitches to inches:
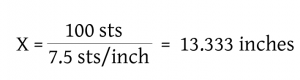
3. Required measurements
Now let’s make a rough sketch of the sweater and mark all the required measurements:

4. Calculate Measurements
Now go through the list of measurements and match them to the indications in the pattern.
A. Width at bottom edge of body
Pattern says: Cast on 108 sts ->
A = 108 sts / 7.5 sts per inch = 14.4″
B. Width at bust
This is the width before you start the armhole decreases.
Pattern says … until there are 130 sts on the needle ->
B = 130 / 2.5 sts per inch = 17.333 ”
C. Length from bottom edge to armhole
Pattern says: until front measures 12.25″ from the beginning
so conveniently we don’t have to calculate anything here ->
C = 12.25″
Instead of continuing with Measurement D it is easier to look at two other measurements first:
H. Depth of Neckline
For this measurement we have to count these rows from the pattern text (beginning with the first row of neck/shoulder shaping):
Pattern says:
next row: Ptn. 39, turn. -> 1 row
Cont. in ptn. on these 39 sts., dec. 1 st, at neck edge on every row until 27 Sts. rem.
“at neck edge” means every other row
39 – 27 sts = 12 decreases every other row -> 24 rows
Work 3 rows without shaping
Next row: Cast off 9 sts., work to neck, Next row: Work to end of row. Rep, these 2 rows once. -> 4 Rows
Put it all together: 1 + 24 + 3 + 4 rows = 32 rows
D = 28 rows / 9 rows per inch = 3.55″
G: Length of front from armhole to neckline
This is where the division for neckline / shoulders begins.
Pattern says: … until work measures 17″ from the beginning ->
G = 17″ – 12.25″ (length up to armhole) = 4.75″
D. Armhole depth
This is the length from the beginning of the armhole shaping until the beginning of the shoulder shaping.
D = G + H minus the 4 rows for shoulder shaping. (4 Rows / 9 rows per inch = 0.444″)
D = 4.75″ + 3.55″ – 0.444″ = 7.86″
E. Width across upper body
This is the width after the armhole shaping.
Pattern says: ...until 96 sts remain ->
E = 96 sts / 7.5 sts per inch = 12.8 ”
F. Shoulder width
This is the width of one shoulder after separating for the shoulders and front neckline.
Pattern says: … until 27 sts remain ->
F = 27 sts / 7.5 sts per inch = 3.6 ”
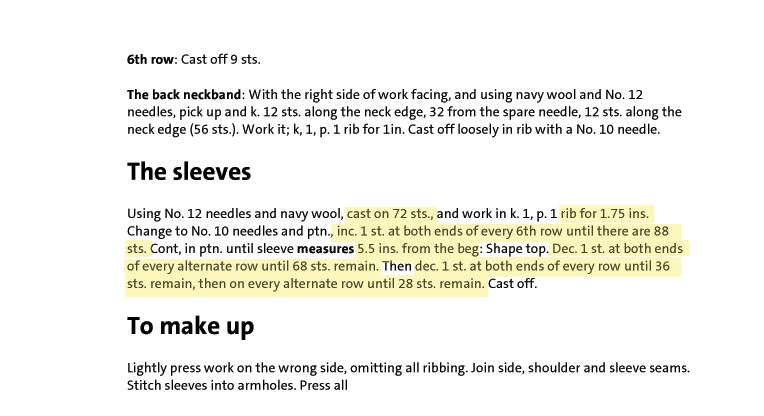
I. Width of sleeve at bottom edge
Pattern says: … cast on 72 sts ->
I = 72 sts / 7.5 sts per inch = 9.6 ”
J. Length of sleeve from bottom edge to armhole
Pattern says: Cont, in ptn. until sleeve measures 5.5 ins. from the beg ->
J = 5.5″
K. Width at upper arm
This is the width before the shaping of the sleeve top begins.
Pattern says: … until there are 88 sts ->
K = 88 sts / 7.5 sts per inch = 11.733″
So, that wasn’t so hard up to now, was it? The next step will be to take your own measurements.